


How to Install Mud Flaps: Easy Steps to Enjoy a Cleaner Ride
Mud flaps are flexible panels that hang behind each wheel. They catch the rocks, mud, and water thrown by the moving tires. Learning and installing mud flaps takes only about 15 to 30 minutes.
What matters is getting a clean, secure, and steady fit that makes mud flaps work. A mud flap sits behind the tire and intercepts debris on its way off the wheel. It doesn't stop debris from flying. Instead, it reduces how much reaches your paint, rocker panels, and the cars behind you.
The EPA says rock salt corrodes cars, trucks, bridges, and roads. Proper installation matters because a loose or misaligned flap can rattle, rub the tire, or fall off. This guide covers the tools, steps, and fixes you need.
What Tools Do You Need to Install Mud Flaps?
Most mud flap installs need a few hand tools and a clean workspace. Kits that use factory mounting points need the least. Kits that need drilling add a drill and a few extra supplies.
Essential Tools for a Basic Mud Flap Installation
First, gather the basics. A standard install requires some basic tools like –
- A socket set and a screwdriver or trim tool for the fasteners.
- The hardware that came with your kit, laid out and counted.
- A rag and mild cleaner for the wheel wells.
- A flashlight so that you can see the mounting points.
If your kit needs a drill, you will need a few more items.
Additional Tools for Mud Flaps That Require Drilling
Next, drill-on kits need extra gear. Universal flaps may require drilling or trimming. Add a drill with sharp bits, a marker for marking hole locations, and masking tape to protect the paint.
Also, keep safety glasses and a deburring tool nearby. Always stick to your kit's provided template and instructions. Before you start, prepare the space.
How to Prepare Your Vehicle and Work Area
Likewise, take the time to set up safely. Park on a firm, level surface, set the parking brake, and chock the wheels.
If you must lift the vehicle, know its recommended lift points and use jack stands. Never rely on the jack alone. Many installs only require turning the wheels, so skip the lift if you can.
How to Install Mud Flaps Step by Step
The process is simple. Confirm the fit, clean the area, remove the factory fasteners, align the flap, secure it, and check tire clearance.
Details may vary slightly by vehicle and kit. Always follow your kit's instructions. Take a look at how to install mud flaps in seven steps.
Step #01: Confirm Vehicle Fitment and Identify Each Mud Flap
First, check that the kit matches your exact year, trim, and tires. Custom-fit kits must match the exact trim, year, and any modifications. Then lay out the flaps and find the left and right sets. Front and rear flaps often differ.
Step #02: Clean the Wheel Wells and Inspect the Mounting Points
Next, wash away dirt and grit. Clean the wheel well before you test-fit. While you work, inspect the fender liner and clips for cracks. Replace anything broken now. A clean surface helps the flap sit flat.
Step #03: Turn the Front Wheels for Better Access
Turn the steering wheel fully to one side. The front tire swings away from the wheel arch, giving you room to work. Chock the wheels first, then turn them the other way for the opposite side. It should get you to the fasteners.
Step #04: Remove the Required Factory Fasteners
Now, remove the necessary fasteners. Many mounts hang from clips along the fender liner, and some use bolts behind the arch. Keep every loose piece in a cup. Take a photo before you remove anything.
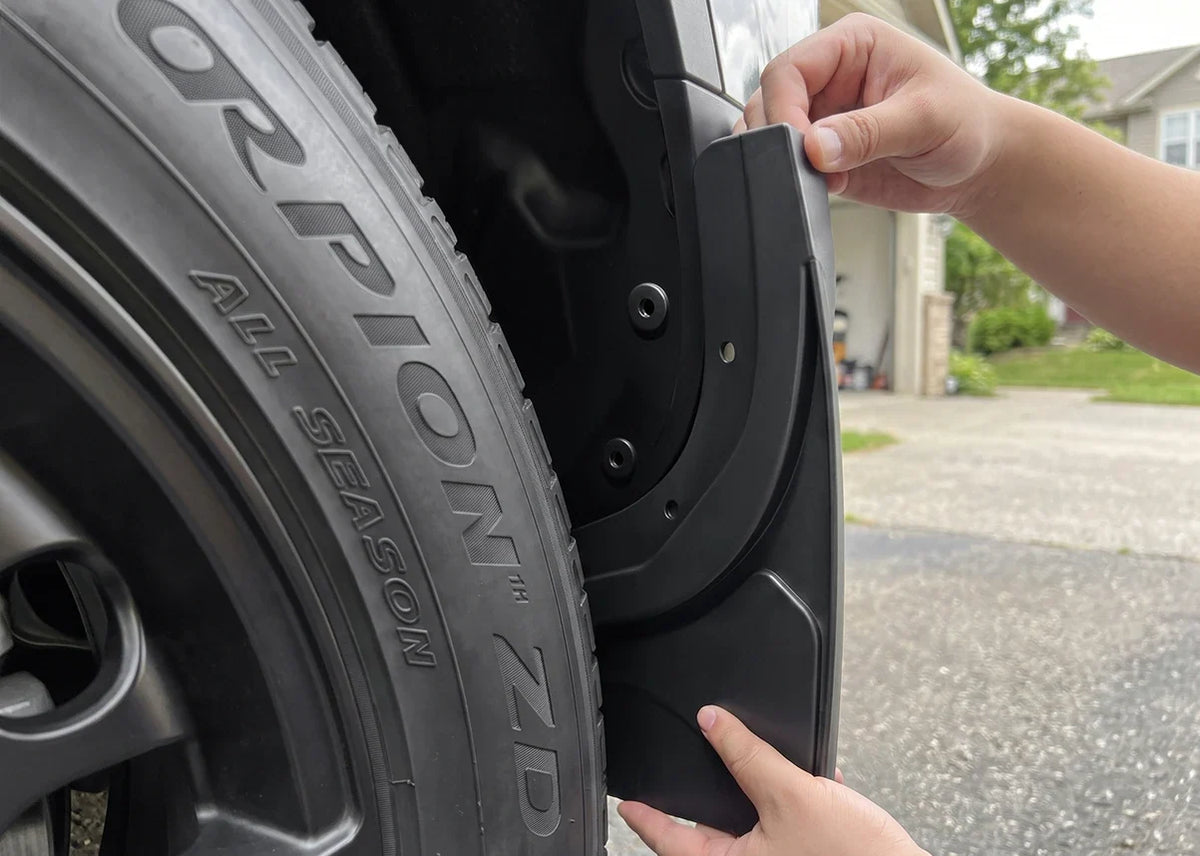
Step #05: Align the Mud Flaps with the Mounting Holes
Hold the flap in place and test-fit it before you tighten anything. A good fit follows the wheel arch, leaves an even gap, and lies flat against the liner. If the holes do not line up, stop and recheck the part. Once the flap lines up, secure it.
Step #06: Attach the Mud Flaps and Secure the Hardware
Start every fastener by hand. Tighten each fastener evenly, a little at a time, so the flap doesn't twist. Don't overtighten plastic parts. Follow the kit's guidance for the correct hardware. Then, check the clearance.
Step #07: Check Tire Clearance and Repeat on the Remaining Wheels
Turn the wheels lock to lock and watch for rubbing. The flap should clear the tire at every angle. Repeat the steps on the other wheels. Drive gently afterward, and re-check the hardware after about 50 miles. Next, look at no-drill installs.
How to Install Mud Flaps Without Drilling
You'll need a vehicle-specific kit that bolts to factory mounting points. Many drivers prefer no-drill mud flaps because they avoid new holes in the body. Not every vehicle supports a no-drill install, so check your listing first.
How No-Drill Mud Flaps Use Factory Mounting Points
A no-drill flap hangs from hardware already in the car. These are clips along the fender liner and sometimes bolt points behind the arch.
That means the install is reversible. You can unbolt the flap before a trade-in and leave only the original clips. After that, consider the liner holes.
Can You Install Mud Flaps Using Existing Fender Liner Holes?
Sometimes, yes. If your kit is made for those holes, it'll use them. Universal flaps may require drilling or trimming.
Don't force a universal flap into factory holes. Always check the instructions before you reuse a mounting point.
No-Drill vs. Drill-On Mud Flaps: Which Installation Method Is Better?
No-drill kits suit most owners, while drill-on kits suit special cases. A no no-drilled install cuts through the liner or body and can expose protective coating to winter conditions.
That said, roadside salt is rather tough on bare automotive metal parts. Pick drill-on only when no vehicle-specific kit exists.
How to Install Mud Flaps on Different Vehicles
The steps stay similar, but mounting points, wheel clearance, and hardware vary by vehicle. Never assume one generic method fits all.
How to Install Mud Flaps on a Car or Sedan
Cars sit notably lower, so clearance is tight. Lowered cars can catch their flaps on driveways and speed bumps. Choose a kit made for your model and keep the flap inside the body line.
How to Install Mud Flaps on an SUV
SUVs often have bigger tires and more wheel-arch space. Check the fit against your tire width, since width, not wheel diameter, sets the flap size. Many no-drill kits use liner clips, so remove them slowly.
How to Install Mud Flaps on a Pickup Truck
Pickups can have taller arches and wider tires, so confirm the kit covers them. Some rules also apply to trucks. For example, Texas requires flaps on certain heavy trucks to be at least as wide as the tires and hang close to the road. Check your own state's rules, especially for work trucks.
Installing Mud Flaps on Lifted Trucks or Vehicles with Larger Tires
Lifts, spacers, and wider tires usually call for XL or oversized flaps. Size the flap for the largest wheel you run, and check winter tires too. Larger tires also need more clearance at full steering lock.
Common Mud Flap Installation Mistakes and How to Fix Them
Most mud flap installation problems come from poor fit, loose hardware, or rushed drilling. Spot the problem early, inspect the mounting points, and stop if something looks wrong. Call a professional when you're uncertain.
Mud Flap Holes Do Not Line Up with the Factory Mounting Points
Misaligned holes usually mean the wrong kit or the wrong side. Double-check your year, trim, and left/right parts.
Never force the hardware. If the kit is correct and still doesn't fit, contact the manufacturer. Seek online help as well.
Mud Flaps Rub Against the Tires or Hang Too Low
Rubbing means the flap sits too close to the tire. Loosen the hardware, reposition the flap, and retest at full lock. If the attached flap hangs low, it may eventually catch curbs. Recheck the kit for your exact ride height.
Loose Fasteners Cause Rattling or Flapping
Vibration can loosen hardware. Re-tighten after the first few miles for this reason. Snug each fastener, replace any worn clips, and check again after a short drive.
Mud Flaps Sit Unevenly or Leave Gaps Around the Wheel Arch
Meanwhile, gaps and uneven edges point to a flap that isn't seated flat. A good fit follows the arch with an even gap.
Loosen the hardware, press the flap flat against the liner, and retighten in small steps. That should leave zero openings.
Drilling Mistakes and How to Prevent Rust Around New Holes
New holes expose bare metal. Drilled installs can expose protective coating to winter conditions. The EPA says road salt corrodes vehicles.
Mark the spots carefully, use a template, and seal any bare edges with touch-up paint or a rust inhibitor. If you are unsure, have a shop drill it.
How to Check Mud Flap Fitment and Maintain After Installation
Check clearance at full steering lock, re-tighten the hardware after a few drives, and clean the flaps regularly. A short check each season keeps them secure and effective.
How to Check Tire Clearance at Full Steering Lock
Turn the steering wheel fully left, then fully right, while you watch each front tire. The tire shouldn't touch the flap in any condition. Also check the rear wheels after a short drive. If you added wider tires, recheck the clearance.
How to Inspect Fasteners After the First Few Drives
Check every fastener after about 50 miles. Vibration can loosen hardware, so a quick re-tightening saves headaches. Then check the hardware once a season.
How to Clean Mud Flaps and Inspect Them for Damage
Rinse behind the wheels during every wash. Look for cracks, torn edges, and bent mounts. Rinse loose salt off often (whenever possible).
Material also matters here. Rigid plastic can turn brittle and crack in the cold, while soft rubber can bend out of the debris path at highway speed.
When Should You Replace or Reinstall Mud Flaps?
Replace a flap after a hard impact or if lower-grade plastic cracks in extreme cold. Reinstall it if it sags or shifts out of place.
A no-drill flap can eventually come loose, leaving only the original clips. Keep your hardware safe for the next install.
Conclusion
Properly installing mud flaps takes four steps: match the kit to your vehicle, choose a no-drill fit, tighten evenly, and recheck after a few drives. Take your time, and stop if anything doesn't line up. Installing mud flaps can be as simple as it looks.
We've covered every step, what you need for a perfect match, and potential concerns. Sometimes you'll need genuine replacements or reinstalls. That's when you won't have to turn to costly professional services to get the job done.
Frequently Asked Questions (FAQs)
How long does it take to install mud flaps?
Most installs take about 15 to 30 minutes with basic tools. However, that's not always the case. Drill-on kits take longer because you must mark, drill, and seal the holes.
Can I install mud flaps myself?
Yes, in most cases. No-drill kits need only basic hand tools and a careful approach. If your kit needs drilling or the vehicle must be lifted, work safely on jack stands, or hire a shop.
Can I install mud flaps on a lifted truck?
Yes, but choose the right size. Lifts, spacers, and wider tires usually call for XL or oversized flaps. Check the clearance at full steering lock, and recheck after you change tires.
Are custom-fit mud flaps better than universal mud flaps?
Yes, for most drivers. Custom-fit kits are easier to install because they use factory mounting points. Universal flaps may require drilling or trimming. Universal flaps can still work when no custom kit exists, but they require more care to fit.

Leave a comment
All comments are moderated before being published.
This site is protected by hCaptcha and the hCaptcha Privacy Policy and Terms of Service apply.